
How to Handstand, a step-by-step guide
Master your own body with this step-by-step guide to develop a handstand

Anyone can learn to handstand with enough practice and coaching
This forms the first part in a series of intermediate exercises, following on from the beginner’s series.
The handstand
Handstands are a superb exercise and seem to be very popular currently with the rise in interest around the area of gymnastics, calisthenics and crossfit.
Being able to perform this exercise correctly carries over a range of benefits to your general health and training: improving your alignment, posture, spatial awareness and joint/core strength simultaneously.
Be prepared for it to take a while to get to grips with this one, especially if you are relatively new to training or lack mobility through the shoulders. This will take time to overcome, along with safely developing adequate strength.
There are several aspects to a great handstand, which all need to be developed well in order to be able to develop a strong movement.
Hands, wrists and positioning
As the only contact point with the floor, ensuring that the hands and wrists are sufficiently strong and mobile is important to avoid injury and set up the initial solid base. The hands are essentially adopting the same role that the feet do when we are standing (thinking of them like this often helps to visualise how to keep balance).
Spread the fingers wide, with the index fingers ideally pointing forwards (you can turn the hands slightly out if you suffer with wrist immobility). The weight should be sitting mostly through the 1st knuckles of the index and middle fingers.
Open up the shoulders and push up constantly
By this I mean externally rotate the upper arm (rotate so the elbows pits face forwards). We are aiming to push the hands into the ground continually and grip the floor – this has the effect of stabilising the shoulder girdle and helping to maintain a good shape.
Maintain a hollow body shape
This is best practiced initially by developing both the Prone and Supine dish holds – these replicate the position that we want to be in during the handstand.
Point the toes, push the feet to the roof and squeeze the glutes
By doing this we encourage the body to be more extended and as a result it is easier to attain good alignment (as long as your centre of mass is over the hands, you will be able to balance – but initially we want to try and achieve excellent form and alignment before playing around with alternate body positions).
What we are looking for overall initially is for the ankles, hips, shoulders and hands all to be aligned.
Basic progressions and assistance exercises towards the handstand

Build handstand strength with a 45º wall hold
Try working these six moves into your training to build up your handstand strength and mobility. The better you get at these moves, the better you’ll get at handstands.
Hollow body hangs
Start by hanging completely relaxed from a bar then pull your shoulders down and back (depress the shoulder blades) into the joint and tighten your core. By pulling your shoulders down, your body will go up – do not bend your elbows or knees. Keep the feet together and point the toes and squeeze the glutes.
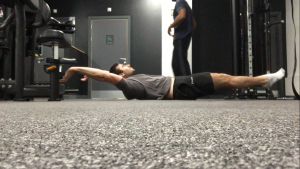
Supine dish hold
Lie down on the floor and start with your knees in a tucked position. Point your toes and squeeze your thighs together. Suck your belly button towards your spine which should force your lower back into the floor (this needs to be maintained throughout the hold) and extend your legs out. Your legs should finish about an inch or so from the ground, toes still pointing forwards and thigh and glutes still tight. Build up to minute holds before adding in progressions, such as arms outstretched past your head.
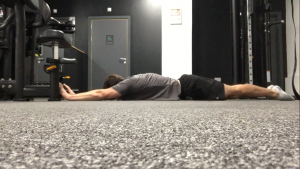
Prone dish hold
Lie outstretched pushing hands and feet away. The only part of body not in contact with the floor is belly button which should be ‘pulled in’ using the lower abs, hold this position for time. This is harder than is sounds when done correctly
45degree wall hold
Start in a plank position on the floor with your feet by the wall. Step both feet up to the wall and open your shoulders as you push your fingers into the ground and grip the floor.
Handstand wall walks
Stand with your back against a wall then bend over to place your hands on the floor. Then walk your feet up the wall into a handstand position. Then walk your hands a little closer to the wall to get as vertical as possible. Pause at the top then walk back down, moving your hands away. Repeat.
Chest to wall handstand
Walk into a handstand like above and hold. The goal is to hold this position for as long as you can. Ideally only your toes will be touching the wall lightly. The wall helps to provide you with feedback as to your body position. If you feel that your chest is touching the wall your balance or shape may be off and you can correct.
This article was written for www.omwfitnessmagaine.co.uk originally, and further intermediate walk-throghs will be available both here and there soon.
No Comments